Thinking about making your home a bit smarter? It’s not as hard as you might think. You can totally do this yourself, and it’s a great way to make your place more convenient. We’re going to walk through how to install home sensors, step by step. No need to call in the expensive pros for this.
Key Takeaways
- Understand what smart home sensors can do for your daily life.
- Choose the right sensors that work with your existing setup.
- Follow simple steps to install and connect your new devices.
- Learn how to set up your smart hub for complete control.
- Discover ways to automate your home and save money.
Getting Started With Your Smart Home
So, you’re thinking about making your home a bit smarter? That’s awesome! It might sound like a big, complicated project, but honestly, it’s way more doable than you probably think. Turning your house into a connected haven is easier than ever, and it can really make your day-to-day life smoother and more enjoyable. Forget about needing to be a tech wizard or hiring expensive pros. We’re going to walk through how to get your smart home set up, step by step.
Transform Your House Into a Smart Haven
Imagine walking in the door and your lights turn on automatically, or telling your home to adjust the temperature without lifting a finger. That’s the kind of magic we’re talking about. It’s not just about fancy gadgets; it’s about making your home work for you, saving you time and maybe even some money. We’ll show you how to pick the right gear and get it all talking to each other.
The Joy of a Connected Home
What’s the big deal with a connected home? Well, think about convenience. You can check on your home from anywhere, get alerts if something’s up, and even automate simple tasks. It adds a layer of comfort and security that’s pretty great. Plus, it’s kind of fun to see everything work together!
DIY Smart Home Integration Made Easy
This guide is all about empowering you to do it yourself. We’ll break down the process into manageable chunks, covering everything from picking out your first sensors to getting them all linked up. You’ll learn practical tips, like how to handle simple wiring and how to make sure your devices play nicely together. Get ready to build a smarter home, your way.
This guide is designed to make smart home setup accessible to everyone. We focus on clear instructions and practical advice, so you can confidently build a home that fits your needs and budget.
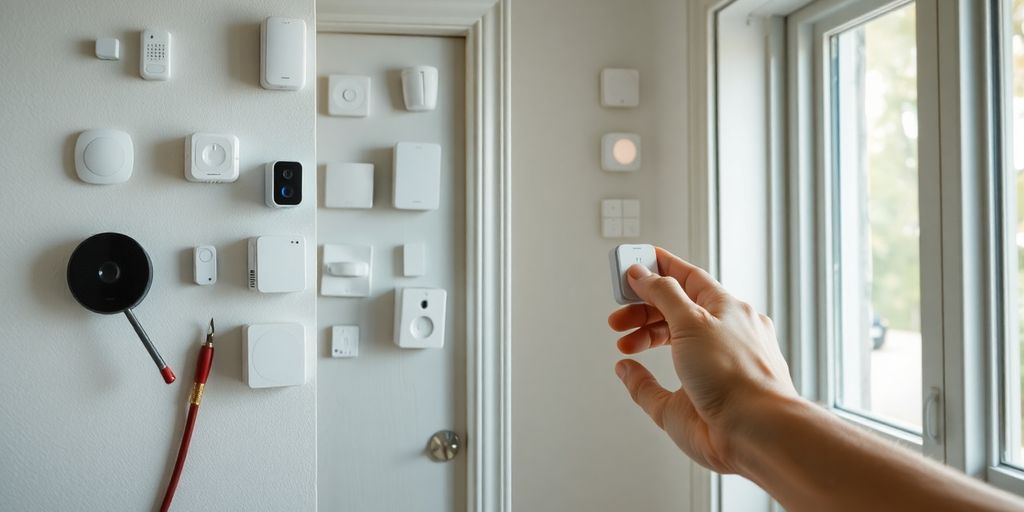
Choosing Your Smart Home Sensors
So, you’re ready to make your home a bit smarter, huh? That’s awesome! Picking the right sensors is like choosing the right tools for a project – you want ones that do the job well and play nicely with each other. It might seem a little overwhelming at first, but think of it as building your own custom smart home experience.
What Sensors Can Do For You
Sensors are the eyes and ears of your smart home. They detect things like motion, temperature changes, whether a door or window is open, or even if there’s water where it shouldn’t be.
- Motion Sensors: Great for knowing when someone’s home or triggering lights automatically.
- Contact Sensors: Perfect for security, letting you know if doors or windows are opened.
- Temperature/Humidity Sensors: Help manage your thermostat efficiently and keep an eye on comfort levels.
- Water Leak Sensors: Give you peace of mind by alerting you to potential water damage early.
Selecting the Right Devices
When you’re picking out sensors, think about what you actually want them to do. Do you want to boost your home security? Make your daily routines smoother? Save energy?
Start with a clear goal in mind. For example, if security is your main concern, you’ll want to focus on contact sensors for doors and windows, and maybe some motion detectors. If you’re looking to save on energy bills, temperature and smart plug sensors might be your first stop. Don’t feel like you have to get everything at once; you can build your system over time.
Compatibility is Key
This is a big one! Not all smart devices talk to each other easily. You’ll want to make sure the sensors you choose work with your smart home hub or platform. Most systems use protocols like Wi-Fi, Zigbee, or Z-Wave.
It’s super important to check the packaging or product description for compatibility information. Look for logos or statements that say things like "Works with Alexa," "Works with Google Home," or "Works with Apple HomeKit." If you’re planning on using a specific system, like one of the best smart home security systems, make sure your chosen sensors are on their approved list. This avoids headaches later on!
The Installation Process
Ready to get your hands dirty and actually install those smart home sensors? It’s easier than you might think! We’ll walk you through everything, from pulling the gadgets out of the box to getting them connected and talking to your smart hub. No need to be an electrician or a tech wizard; these steps are designed for anyone who wants to make their home a little smarter.
Unboxing and Initial Setup
First things first, let’s get everything out of the packaging. You’ll usually find the sensor itself, maybe some mounting hardware like screws or adhesive pads, and a quick start guide. Take a moment to check that you have all the pieces listed. Most sensors are pretty straightforward – often just a small device that might need batteries inserted. If your sensor requires batteries, make sure you have the correct type handy. It’s also a good idea to have your smartphone or tablet nearby, as you’ll likely need it for the next steps. For a smooth setup, consider checking out Monnit Sensor installation guides for specific device instructions.
Connecting Your Sensors
This is where the magic starts to happen! Connecting your sensors usually involves using a mobile app provided by the manufacturer. You’ll typically create an account or log in, then follow prompts to add a new device. This might involve scanning a QR code on the sensor, pressing a button on the sensor to put it in pairing mode, or entering a serial number. The app will then guide the sensor to connect to your Wi-Fi network or directly to your smart hub. It’s all about getting these little helpers talking to your central system so they can start doing their job.
Simple Wiring Tips for Beginners
While many sensors are wireless and battery-powered, some might require a wired connection, especially if they need a constant power source or a direct link to your network. If you encounter wiring, don’t sweat it! Most smart home devices designed for DIY use simple plug-and-play connectors or low-voltage wiring that’s safe and easy to manage. Always make sure the power is off before you touch any wires. If you’re connecting to a smart hub or a power source, double-check that you’re using the correct ports.
Remember, the goal is to make your home smarter, not to create a new headache. Take your time, follow the instructions, and if something feels off, it’s always okay to pause and consult the manual or a quick online tutorial.
Setting Up Your Smart Hub
Think of your smart hub as the brain of your connected home. It’s the central point where all your sensors and devices talk to each other, making everything work together smoothly. Getting this part set up right is super important for a happy smart home experience.
Your Home’s Command Center
Your smart hub is where the magic happens! It’s the device that receives signals from your sensors – like a door opening or a temperature change – and then tells your other smart devices what to do. It’s like having a personal assistant for your entire house. This central control makes managing your smart home incredibly convenient.
Seamless Hub Integration
Connecting your hub to your home network is usually pretty straightforward. Most hubs connect via Wi-Fi or an Ethernet cable. Once it’s plugged in and powered on, you’ll typically use a smartphone app to guide you through the rest of the setup. This app will help you link your hub to your Wi-Fi network and get it ready to start communicating with your sensors. It’s all about making sure your devices can find each other easily.
Achieving Total Control
Once your hub is connected and your sensors are paired, you’re ready to start really customizing your smart home. This is where you can create rules and automations. For example, you could set it up so that when your door sensor detects the door opening after sunset, your smart lights automatically turn on. Or, if a water leak sensor detects moisture, you get an instant alert on your phone. It’s all about making your home work for you, and the hub is the key to making that happen. You can even use your tablet as a Home Hub to manage everything.
Here’s a quick rundown of what you can do:
- Automate lighting: Have lights turn on when you enter a room or turn off when you leave.
- Adjust climate: Set your thermostat to change based on whether you’re home or away.
- Enhance security: Get alerts if a window or door is opened unexpectedly.
- Monitor energy: Track your energy usage and find ways to save.
Setting up your hub might seem like a technical step, but most manufacturers have made it really user-friendly. Just follow the app’s instructions, and you’ll be controlling your smart home in no time. It’s a really rewarding part of the process!
Automating Your Home for Ease

So, you’ve got your sensors installed and your hub connected. Awesome! Now comes the really fun part: making your home work for you. This is where the magic of automation really shines. Think about it – your lights turning on when you walk in the door, your thermostat adjusting itself based on the weather, or getting a notification if a door is left open. It’s all about making your life simpler and more comfortable.
Making Your Home Work for You
Automation isn’t just about convenience; it’s about creating a home that anticipates your needs. You can set up your system so that when you leave for work, everything powers down to save energy, and when you’re on your way home, your lights and heating kick in. It’s like having a little helper that takes care of the little things, so you don’t have to.
Creating Smart Routines
This is where you really get to play director of your own smart home. Routines are basically a set of actions that happen automatically when a certain trigger occurs. For example, you could create a "Good Morning" routine that gradually brightens your bedroom lights, starts your coffee maker, and reads you the news. Or a "Movie Night" routine that dims the lights, closes the blinds, and turns on the TV. The possibilities are pretty much endless, and it’s all about tailoring your home to your lifestyle.
Here are a few ideas to get you started:
- Morning Wake-Up: Lights gradually turn on, thermostat adjusts, and maybe your favorite music starts playing softly.
- Leaving Home: All lights turn off, doors lock, and the thermostat goes into an energy-saving mode.
- Evening Wind-Down: Lights dim, smart locks engage, and maybe a calming playlist begins.
- Security Alert: If a door or window sensor is triggered when you’re away, you get an instant alert on your phone.
Setting up these routines might sound a bit technical at first, but most smart home apps make it pretty straightforward. You’re essentially telling your devices what to do and when to do it, creating a personalized experience that makes your home feel truly yours.
Enjoying Effortless Living
Once your routines are set up, you can just sit back and enjoy the benefits. Your home will feel more responsive, more efficient, and honestly, just a lot cooler. It’s about reclaiming your time and reducing those little daily stresses. Plus, it’s pretty neat to show off to friends and family! Getting smart home technology to work for you is the ultimate goal, and automation is the key to unlocking that effortless living experience. You’ll wonder how you ever lived without it.
Budget-Friendly Smart Home Hacks
Thinking about making your home smarter but worried about the cost? You don’t need to break the bank to get started! There are plenty of ways to add smart tech without emptying your wallet. It’s all about being smart with your choices and focusing on what really matters for your home.
Smart Savings Strategies
Getting a smart home doesn’t have to be an expensive overhaul. Start small and build up. Many companies offer starter kits that bundle popular devices like smart plugs and bulbs at a lower price than buying them individually. Keep an eye out for sales, especially around holidays. You can often find great deals on devices that are a year or two old but still work perfectly well. Think about what problems you want to solve first – maybe it’s just turning lights off remotely or adjusting the thermostat without getting up. Focusing on those specific needs helps you avoid buying gadgets you won’t use.
Maximizing Value on a Budget
When you’re on a budget, compatibility is your best friend. Look for devices that work with established ecosystems like Google Home or Amazon Alexa. This way, you can often control multiple brands of devices with a single voice command or app, saving you from needing a separate app for every single gadget. Consider devices that offer multiple functions. For example, a smart speaker can play music, answer questions, and control other smart devices. Also, don’t underestimate the power of smart plugs; they can make almost any ‘dumb’ appliance smart for a fraction of the cost of a dedicated smart version. This guide offers an affordable smart home setup for beginners, featuring six easy-to-install, family-friendly devices that don’t require complex setups. It focuses on practical and accessible smart home technology for those just starting out.
Affordable Upgrades That Pay Off
Some smart home additions can actually save you money in the long run. Smart thermostats, for instance, can learn your habits and adjust the temperature automatically, reducing your energy bills. Smart lighting can also help. You can set schedules for lights to turn off when not needed, or dim them to save power. Even simple motion sensors can be programmed to turn lights on only when a room is occupied. These small changes add up, making your home more efficient and your utility bills lower. It’s a win-win situation that makes your home more comfortable and your wallet happier.
You’ve Got This!
And there you have it! Installing home sensors might seem like a big deal at first, but you’ve just walked through all the steps. It’s pretty cool to think about how much easier your home can be with these little helpers. You’ve got the power to make your place smarter, safer, and maybe even save a bit on bills. So go ahead, enjoy your newly upgraded home – you earned it!
Frequently Asked Questions
How difficult is it to set up these smart home sensors?
Setting up smart home sensors is easier than you might think! Most devices connect wirelessly to your Wi-Fi network or a central hub. You’ll usually start by plugging in the sensor or inserting batteries, then using a smartphone app to guide you through the connection process. It’s like connecting a new phone or tablet.
What do I need to install smart home sensors?
You’ll typically need a smartphone or tablet with Wi-Fi and Bluetooth. Many sensors also work best with a smart home hub, which acts as the brain for all your connected devices. Some sensors might need specific tools like a screwdriver, but many are designed for tool-free installation.
What can smart home sensors actually do?
Smart sensors can do a lot! Motion sensors can turn on lights when you enter a room. Door/window sensors can alert you if something is opened. Temperature sensors can help manage your heating and cooling. Water leak sensors can warn you of a burst pipe. It’s all about making your home safer and more convenient.
How do I know if a sensor will work with my smart home system?
Compatibility is super important. Make sure the sensors you buy work with your existing smart home system or hub (like Amazon Alexa, Google Assistant, or Apple HomeKit). Check the product packaging or description for compatibility logos.
Can I really install these myself without being a pro?
Yes, absolutely! Many smart home setups are designed for DIY installation. You don’t need to be an expert electrician. Most sensors are wireless and simply stick onto surfaces or plug into outlets. Wiring is usually only needed for things like smart thermostats or light switches, and even those are often straightforward.
How can I start building a smart home on a budget?
You can start small! Begin with a few key sensors like a smart plug or a motion sensor. As you get more comfortable, you can add more devices. Look for starter kits or bundles, which often offer a good value and include a hub and a few basic sensors.